Building a Template
For today’s post I’m going to be talking about template building for your DAW. As always, I’m looking at things from a Cubase perspective, but a lot of the things mentioned here are transferable.
Photo by Rodion Kutsaiev on Unsplash
Why?
1) Creativity
Imagine you are minding your own business, and then suddenly a great new idea rudely interrupts your train of thought. You rush to your computer to get some serious composing done, and are met with a blank page on your DAW. After roughly an hour of routing tracks and loading instruments, that great idea has long gone, as has all the motivation you had! Having a good template allows you to jump straight into a composing session, so that you don’t lose those great ideas.
2) Time
Setting up a project takes time as we’ll discuss in further detail later on. There are instruments to load, decisions to be made on which articulations to use, where to route each sound, how to organise your tracks in the most user friendly way possible, and much more. Taking some time out and doing this process properly, updating once every couple of months, is a great way of saving time and getting rid of a huge portion of the workload.
3) More Realism
Once you’ve loaded all your instruments, you’ll find that there is still a lot of work to be done! Your flutes will sound louder than your trumpets, the Violins will drown out the rest of the Strings. Each time you spot a problem, you’ll have to stop what you’re doing and sort it out. Having a template that has been tested against a live orchestral recording so that each instrument is at the correct level helps speed up this process. This allows for a great sound straight out of the box!
4) Consistency
If you are working on a project that needs multiple tracks such as a soundtrack or album, you’ll want a consistent sound. It’s no good having instruments sounding like they’ve been recorded in different places from cue to cue. This will distract and takeaway from your music. Having the template ready allows for the balance, panning, and reverb settings to be the same each time.
How do we get started?
Planning & Layout
There are a few important decisions that need to be made before beginning. Where are the instruments going to be stored? How will you layout the instruments in your project? How much control of the sound do you want?
a) Save your progress!
This is probably the most important point of the lot. Create back-ups of your template at every stage. As you build your template, save it as a project file and keep versions of it. For example, Template_2022-v1.0, Template_2022-v1.1 etc. How you name these is just as important – if your current file corrupts, you want to be able to easily find your most recent earlier version.
b) Where to store the instruments?
Two potential options:- load the instruments directly into the template, or use Vienna Ensemble Pro 7 (VEPro 7). The advantage to loading instruments directly into your template is that they are much easier to access. You have everything in one place, and it’s usually one or two clicks to get to the instrument window in order to make tweaks. However, these instruments lead to longer loading up times when opening a project. Another problem is that each individual project file size ends up being larger, taking up valuable space on your hard drive.
VEPro 7 directly addresses these two issues. Having your instruments loaded in VEPro 7 allows you to switch between projects with shorter loading times. Also, each project file will be smaller as result, as every instrument is loaded outside the project. You can also use VEPro 7 on multiple computers, allowing you to increase your RAM capacity. All you have to do is make sure that both computers are connected to the internet via Ethernet cables (you want the fastest internet connection you can have). Then when you load up the plugin in Cubase, each VEPro 7 server should appear, ready to connect. A drawback to this approach is the expense, since you have to buy separate licenses for each computer you use. At time of writing the first licence costs roughly £170, and each extra licence costs roughly £85.
c) Layout of instruments
Individual articulation layout
To achieve a great sounding and realistic piece of music you are going to need a whole host of articulations from each instrument. For example, a Flute will need the option to play joined up legato notes, separate long notes with different attacks, different types of short notes, along with other special techniques such as trilling, flutter tonguing etc. There are various ways to go about this. The way my previous template used to handle this was one track per articulation. This allowed for a huge amount of control, but also clogged up my template.
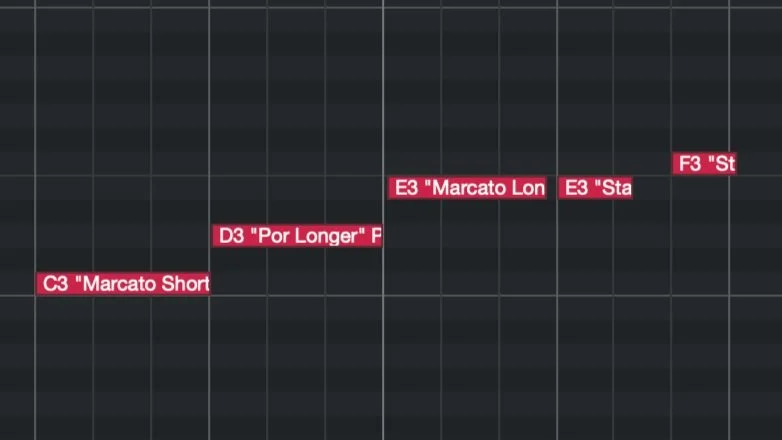
Another approach is to use key switches or the more efficient expression maps. To use these, you create a single track with all the articulations you want loaded into one instance. For key switches you assign a note, usually low down on your keyboard, for each articulation. While recording you can switch between articulations playing these assigned keys. Even better are the expression maps that Cubase offers (I believe that Logic has something similar called Articulation sets). Here you can create your own bespoke versions of key switches that have more flexibility. For example, on Orchestral Tools Berlin Woodwinds, the Flute 2 legato patch has a non-vibrato option and a vibrato option. With the expression map you can create two separate keyswitches to quickly switch between each sound. Another reason to prefer expression maps is that they remove midi clutter from your tracks. When setting up expression maps, I would recommend Attribute type articulations over Direction type. Attribute allows you to select a midi note and choose what articulation you want for it from a drop-down menu, which I find a far more intuitive process.
Expression Maps using Attribute type articulations
It is worth mentioning that Babylon Waves have an extensive collection of pre-made expression maps that you can buy. I found this collection particularly useful as it helped me discover extra options I hadn’t realised were available from my instruments. However, I also found myself editing almost every expression map I used from them. So, I would say they offer a good starting point to using expression maps, but you’ll still need to put some work in.
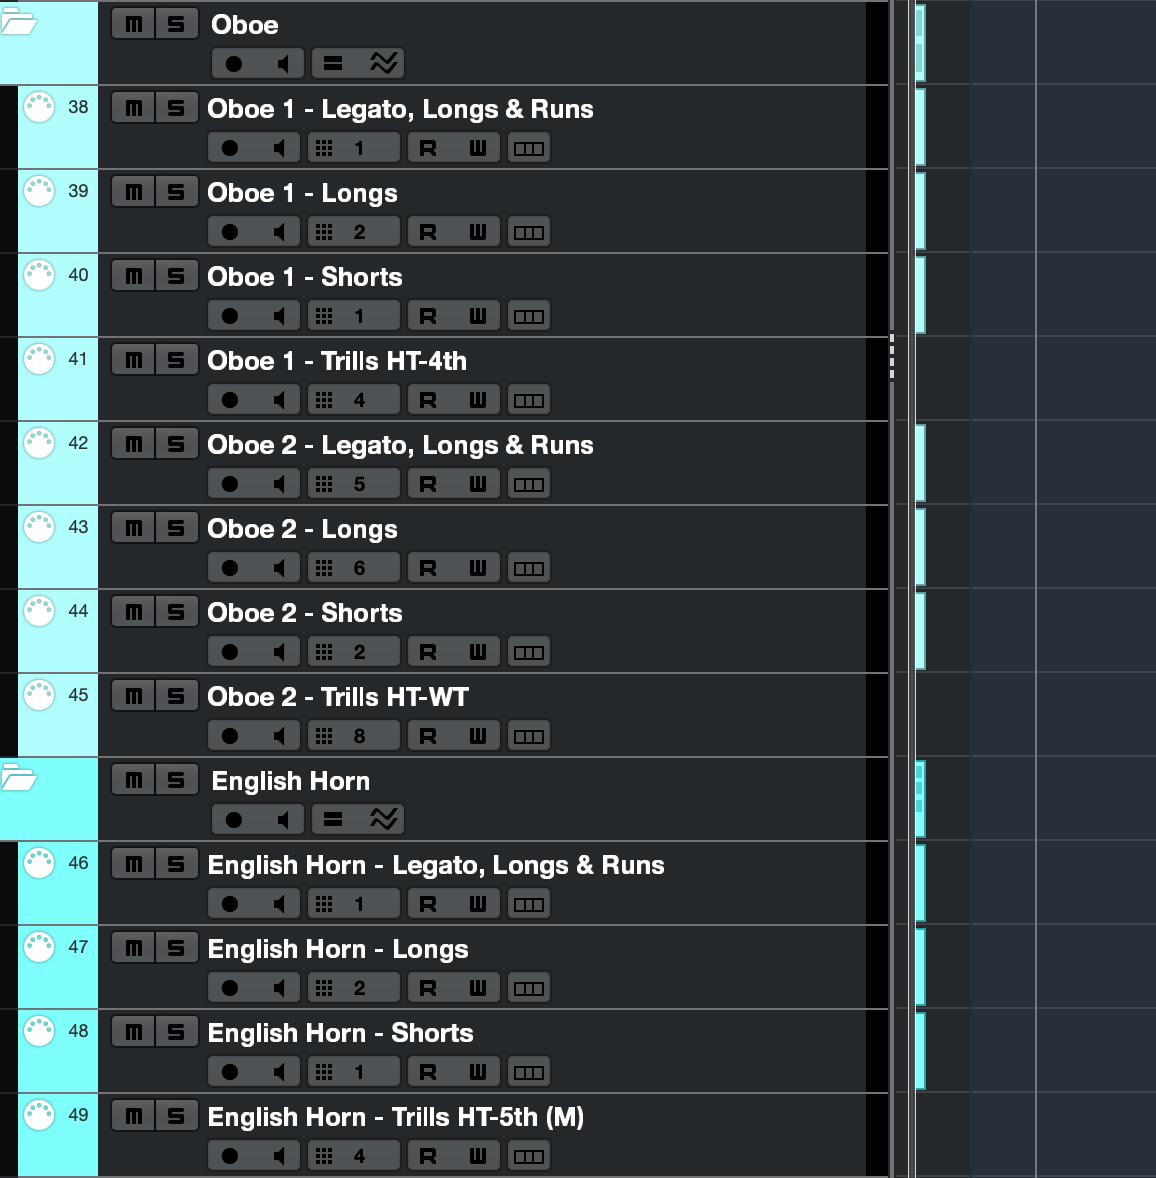
As you can probably tell, I have recently switched approaches to use expression maps. However, I keep some of the control I previously had by separating my tracks into four separate categories: - legato, longs, shorts, and trills.
My new instrument layout
d) Routing your sounds
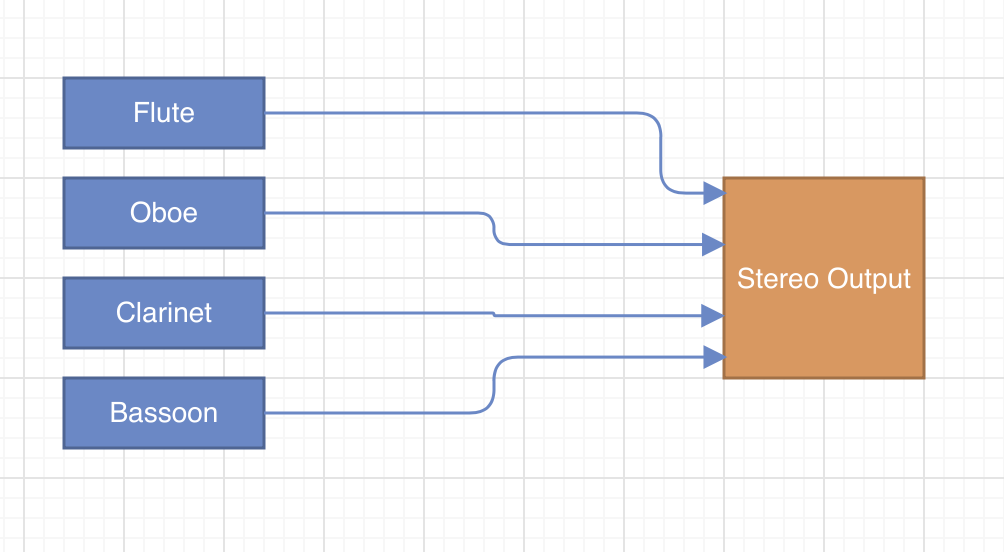
Basic inflexible Routing
A well routed template allows for a lot of control when it comes to the mixing and mastering stages of your music. In Cubase, you can use ‘group’ tracks to funnel your music into different places. For example, let’s say you are working on your Woodwind section. You set up Flutes, Oboes, Clarinets, and Bassoons. To start with each instrument is directly routed to the Stereo Output. In this setup I am able to either edit each instrument directly, or all instruments simultaneously. However, once you start adding other sections to your template you’re going to run into a problem. What if you want to bring down the whole Woodwind section as they are drowning out the Strings? You can’t! Also, as a general rule of thumb avoid relying on the Stereo Output for any kind of mixing
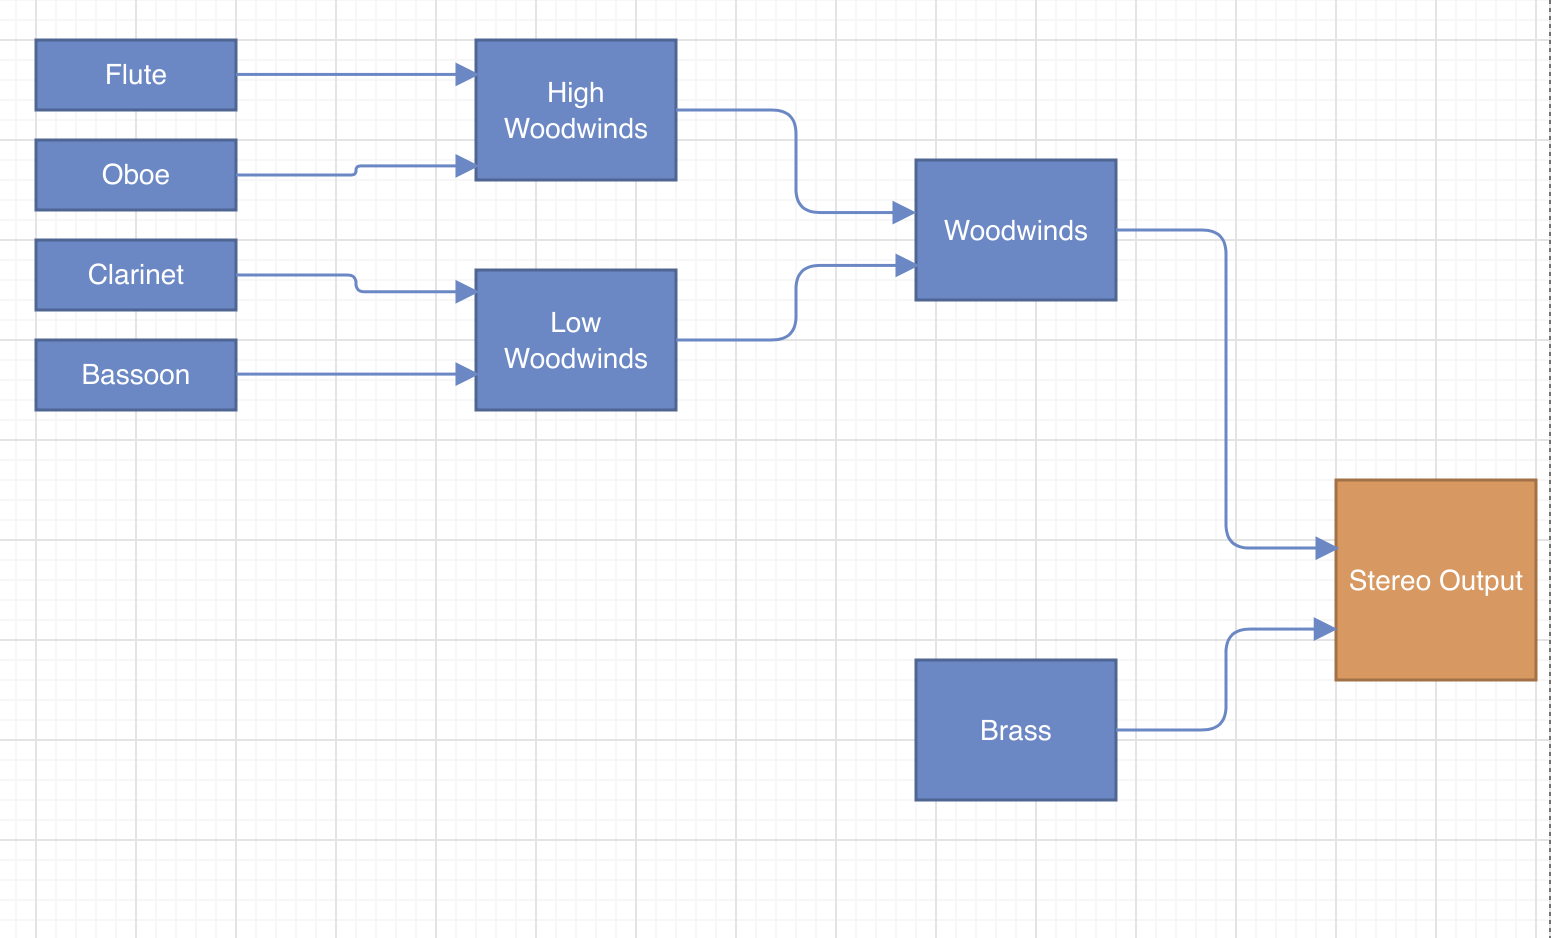
A better system
How about instead I route it so that the Flutes and the Oboes are put into a group track called ‘High Woodwinds’ and Clarinets and Bassoons are put into a track called ‘Low Woodwinds’ (I know that Clarinets can go very high, but it’s important not to be too specific here. If necessary, we can change where the Clarinets go from project to project). I then put ‘High Woodwinds’ and ‘Low Woodwinds’ into a new group track called ‘Woodwinds’, which then goes to Stereo Output. We now have a lot more control than we did before. We can edit instrument by instrument, or by pitch, or by section without touching the Stereo Output. This also makes it much easier to add effects and appropriate reverb to your sounds. One other consideration to make is whether you want to separate out articulations. A common thing to do is have long notes and short notes on separate outputs as this gives more control when adding reverb.
e) Extra Tracks
One final consideration is to add a few extra slots in your template that remain empty for now. These can then easily be used later on to load extra instruments into your project, giving you a bit more flexibility.
Making it sound good
Once you’ve sorted out your template layout, it’s then time to make it sound amazing. If we were to skip this step, as tempting as it might be for some, you’ll end up with an orchestra that sounds incredibly unrealistic, and quite frankly synthetic. Flutes will outgun Trumpets, the Piano will drown out the String section, and no one will be playing in time… it’ll be carnage!
a) Balancing
Balancing is probably the most important part of this process. If quiet instruments are louder than loud instruments, you’ll create an unusual sound – in some scenarios that might work, but as a starting point it is best to begin with realism and go from there. One of the trickiest things about DAWs such as Cubase, is that there are a lot of ways to change the volume. You can change the volume via the instrument window, the pre-gain, the fader, via CC7 and CC11 data, and any of the various group tracks you’ve just set up. So, it is important to have a strategy in mind when approaching this, and to be consistent in your approach.
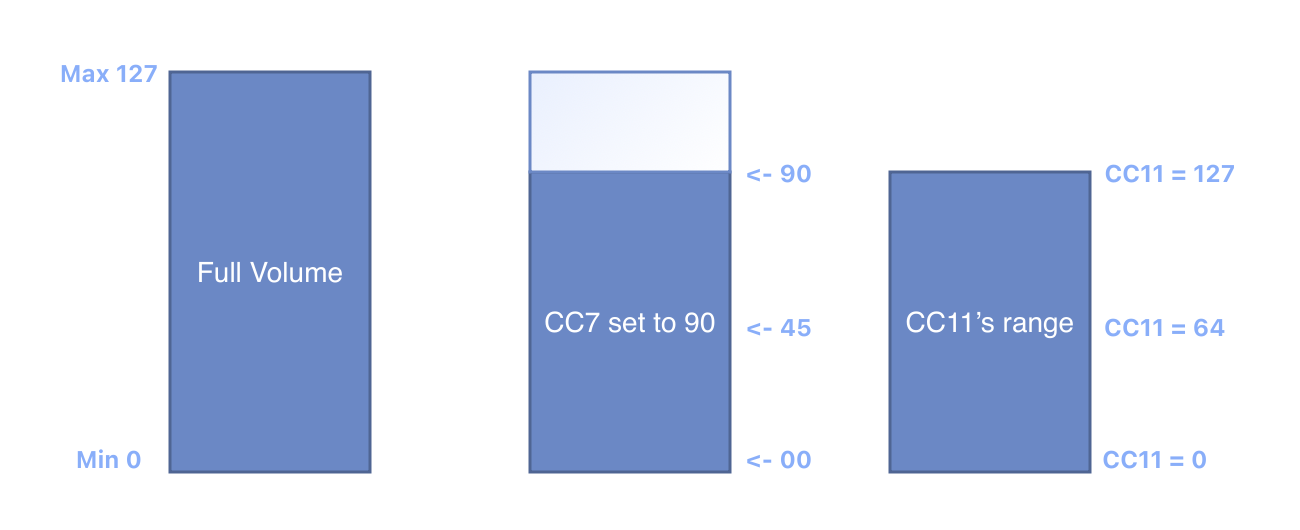
CC7 and C11 comparison
My approach is to use CC7 and CC11, and then to tweak it using the Cubase’s inbuilt pre-gain at the source. CC7 controls the ‘Main Volume’ of the instrument, whereas CC11 controls the ‘Expression’ of the instrument. From my understanding, CC7 controls the entire volume range of the instrument, whereas CC11 controls the volume in relation to the CC7 volume level. Whatever level CC7 is, that is max volume for CC11. For example, if CC7 is set to 90 (all CC is 0-127), 127 on CC11 is the equivalent of 90 on CC7, and 64 on CC11 is the equivalent of 45 on CC7. With this in mind, I use CC7 to work out the loudest I want my instrument to be, and then for normal day to day volume control I use CC11.
Pre-gain
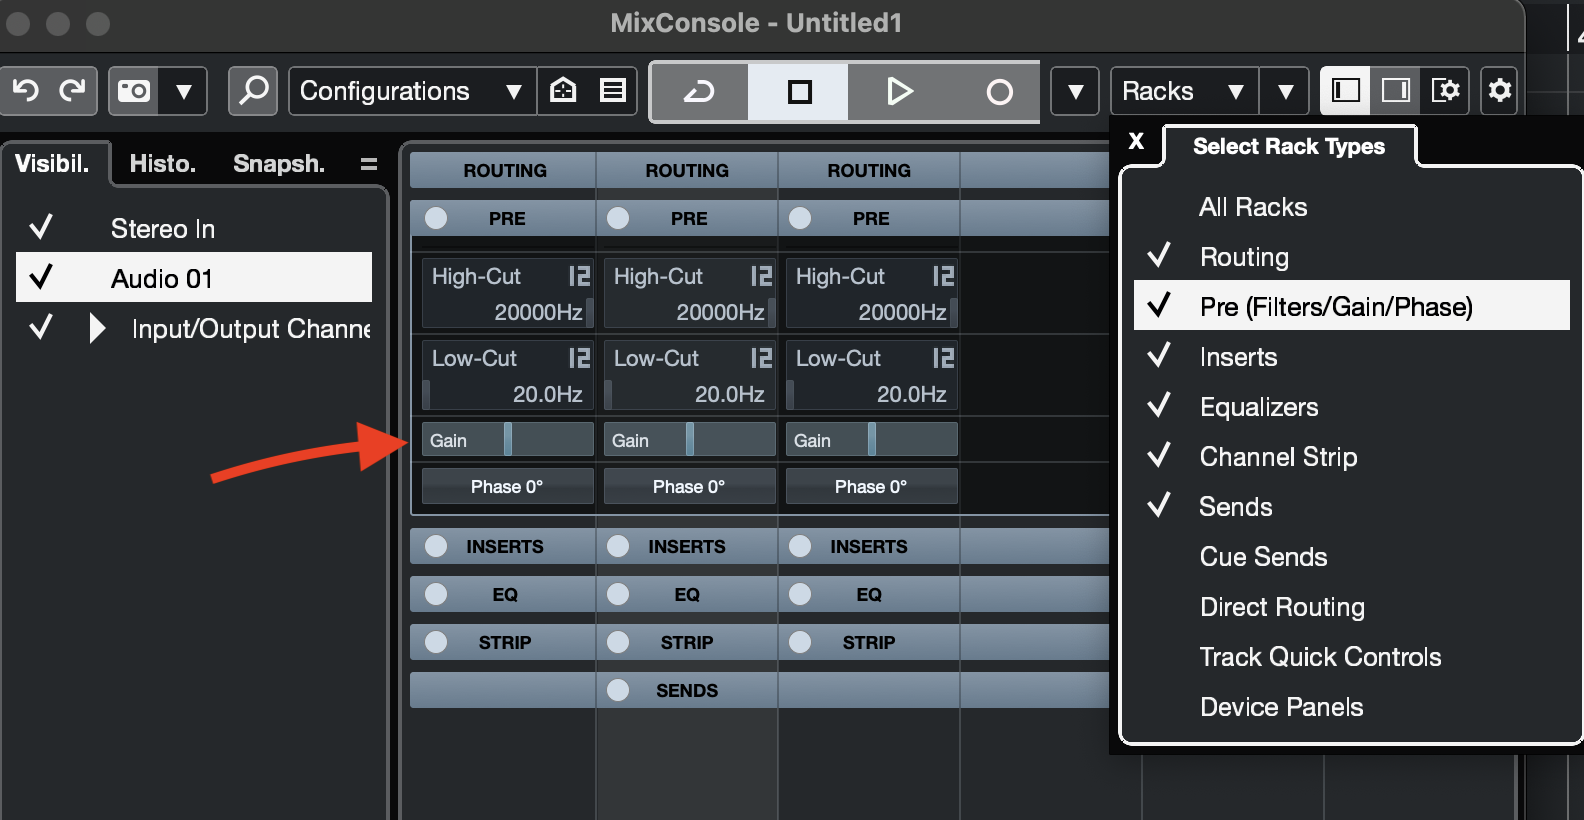
If I find that an instrument still needs to be louder when CC7 is set to max, or needs to be brought down even when CC7 is pretty low, I then use the inbuilt pre-gain feature in Cubase to adjust the volumes. This feature by default is hidden away. To find it you have to go into the mix console and select racks in the top right of the screen and then chose Pre (Filters/Gain/Phase). You can change the pre-gain for any of your tracks. As I use VEPro 7 I adjust the pre-gain on the tracks that VEPro 7 directly inputs into.
Now we know how to adjust the volume, all that remains is to know what to adjust the volume to! Don’t be too perfectionistic here. It’s easy to waste a lot of time on this process. Ultimately you will need to make adjustments on every project you’ll use this template on, so it’s best to aim for a good starting point. Something that hugely helps this process is making a mock-up from a score you own, that you can directly compare to a concert recording of. For my template I used the concert version of John William’s ‘Harry’s Wondrous World’, comparing it to a recording which used the exact same instrumentation. I go into more detail about creating mock-ups here. You don’t have to do much. In my case I used the first 40 seconds, which you can listen to at the bottom of this article.
Once you have you chosen CC7 value for the instrument, save it as a MIDI flag at the beginning of the track. A MIDI flag is a box that contains no midi data other than CC values.
b) Pre-delay
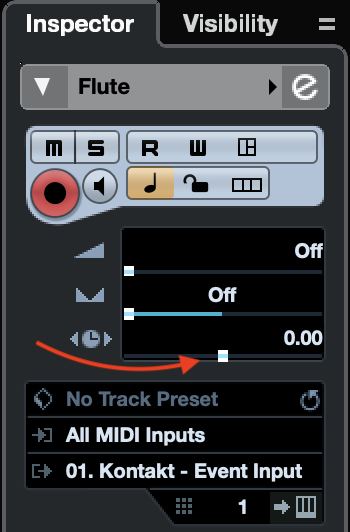
Pre-delay
Most of the instruments you’ll own use recorded samples. As a result, each note you’ll play into your DAW will have a few milliseconds of silence before they begin. This is so there isn’t any pop or crack when you play a note. Unfortunately, there isn’t any industry standard on how much silence is used. So, if you were to use a host of different instruments, and snap all the midi to the beat (quantize), you’ll find that it will sound a jumbled mess! The frustrating thing is that there isn’t even consistency between articulations on the same instrument. Legato patches in particular act strangely due to factoring in transition times between notes.
A potential answer to this problem is to add pre-delay to each midi track in order to trigger the note a little earlier than where the midi sits. This approach is particularly useful when you choose to do the one track per articulation approach I mentioned earlier in the article. It’s not quite so helpful with tracks with multiple articulations as each articulation might have a different starting point. However, I still tend to put a little pre-delay on my tracks which play the short notes. I find that short notes stand out the most when not in time, and also a lot of short articulations tend to have more consistent start points than other articulations.
c) Positioning Instruments
Finally with volume sorted, you now need to place the instruments in the room. Again, a mock-up will help with this, as you’ll be able to compare with a real orchestra. There are a few ways of positioning an instrument. Panning moves the instrument left and right, you’ll find that a lot of modern libraires record their instruments in situ, meaning that they’ll sit down their musicians where they would be sat in the orchestra. As a result, the sound comes already pre-panned. However, it can be useful to tweak positioning – just don’t go crazy!
Here, all the signal is going to the reverb
We know how to move our instruments left and right, but how do we move them forwards and backwards? To do this we use reverb – now this a huge topic but here’s an overview. Create a FX track and put a reverb plugin on it. Send the signal of one of your instruments to it. You can do this in the mix console under sends. You have two options in Cubase, pre-fader (blue) and post-fader (orange). Here is a useful article from Cubase about how they work (ignore the colours in the article, as they made a slightly confusing colour change in recent editions). The Pre-fader is what we want. Once this is set up properly you can use the fader to position your instrument – the higher the fader the closer the instrument. How much of the signal you send to the reverb determines the amount of reverb you’ll hear.
And that’s about it for today. To finish, here’s the mock-up I made with my new template:
Daniel

